Search This Blog

Wednesday, April 30, 2014

Retro Vintage Old Cassette Tapes Lamp Shade (Recycled, Upcycled)


How completely magically awesome is this lamp?! I recently posted a link to a page that had a few great ideas for recycling old cassette tapes and one of those ideas was a lamp shade. Their shade was put together using zip ties and was more of a solid box construction...in retrospect that probably would have been much easier, but I wanted to think outside of the box....bahahahaha...Okay, that was bad, moving on...
As truly awesome as this lamp shade is, it was not the easiest of projects. I really hate it when bloggers post wonderful pictures about their wonderful projects and how wonderful and fun and easy it was ...LIES! Most of my projects have "Learning Experiences" otherwise known as "Epic Failures" filled with frustration, mess and sometimes even minor injury. That being said, I love it! I'm addicted to Pinterest, I'm addicted to Hobby Lobby and I'm pretty sure I want to be buried with my glue gun.

Anyway, on to the kind of a tutorial, I basically started with just a metal triangular top piece from an old shade that sacrificed it's old shade life for my new awesome project...moment of silence...no, not really, that shade sucked, that's why it had to die. So, metal triangle thingy, and then I took some sturdy cardboard (started out with a long wooden dowel, didn't work out, see Epic Failure section above) to make the thick triangle piece that I glued on top of the metal thingy and painstakingly wrapped it in yarn. Then came the equally not fun task of weaving the yarn in through the tapes. I wanted to have a dangling effect so I used a pencil to guide my gaps in between the tapes. Then I just tied the strands of tape to my triangle and Voila! A direct porthole to the 80's was just created in my living room! Endlessly fighting with yarn was totally worth it. :)


Friday, April 25, 2014

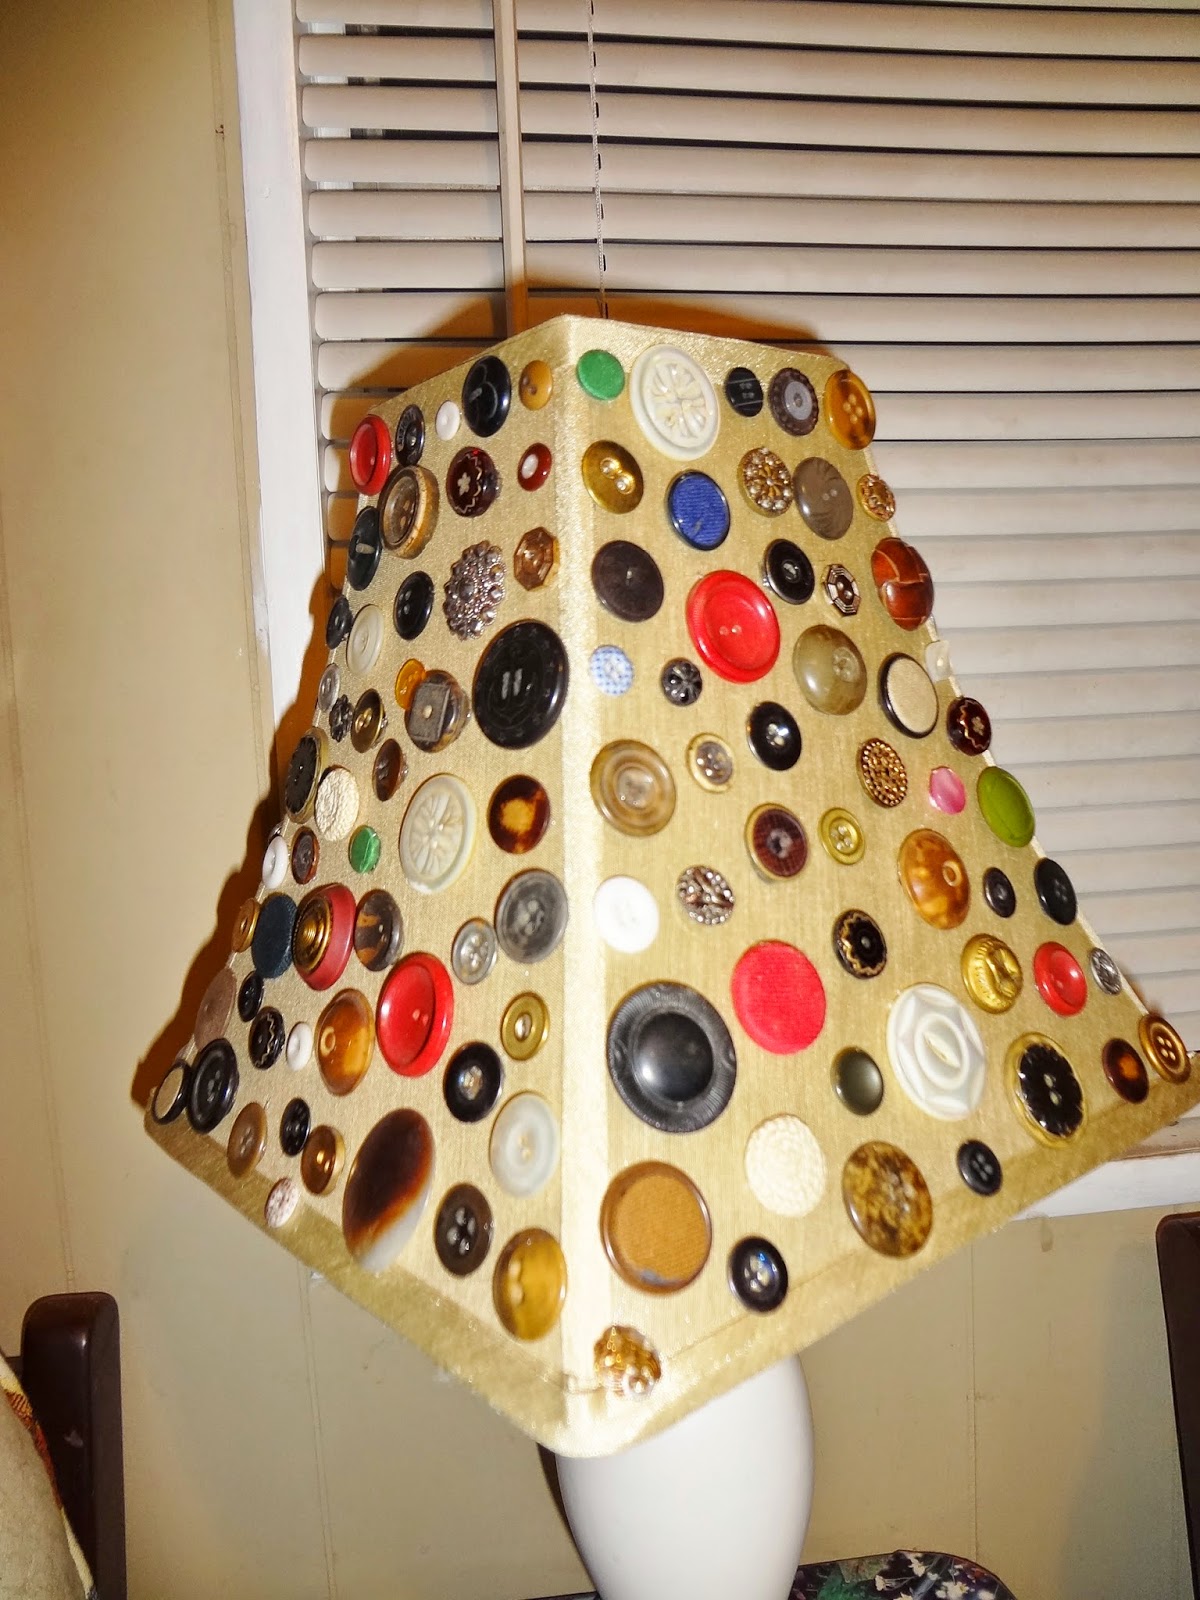
Vintage and Antique DIY Button Lamp Shade

   I've bee wanting to do this for sooo long and I finally did it! I was very lucky in many ways to make the awesomness that is this lamp happen. First off, I already had a bag full of antique and vintage buttons thanks to my lovely, but hoarder of a Grandma. (Love you Grammy!) Secondly, I am a thrift store junkie and I found a couple really great lamp shades and lamp bases for super cheap! (Yes I said couple, so there will be more projects...eventually.) 

So on to the tutorial...Glue the buttons on the lamp shade.
WooHoo, you're done!
Pretty easy stuff right? But here I will offer some tips that I learned from my experience...
1.) Not everyone is automatically gifted a bag full of really awesome buttons. Sucks to be you :( ...BUT :) you can buy vintage buttons in bulk on sites like Etsy or Ebay, Or you can even set out to buy some super wonderful buttons individually. Also check antique stores for jars or tins of buttons.
2.) Try not to over obsess on the placement of the buttons, random is good. (This advice is more of a reminder for me not to get all OCD when doing my projects.)
3.) Hot glue is the devil, but it's also really amazing stuff and I used it here. But if you've never used a hot glue gun before then you need to know that once you put the glue on the button and then the button on the shade, you just committed to that pretty much being it's permanent home, you won't have a lot of time to be moving it around before it dries. And then there is the sea of hot glue stringy mess to deal with...Weeee!

   That's basically it! I really had a blast doing this and my kiddos liked helping me pick out "cool buttons", now on to the next project! 

Thursday, April 24, 2014

Recycle or Upcycle old cassette tapes. Genius!


What an epic idea! I have a shoe box full of my cherished old cassette tapes that, even though I no longer have a device in this house with the capability to even think about playing a tape, I can't seem to part with them. I know that if I have an overwhelming urge to listen to Wham or need to get my Vogue on, I can easily find these old songs online (don't judge me, it was the 80's) but it's the tiny sappy hoarder that lives in my brain that says, as long as I have room in the shed or under a bed, they stay! But now they have an actual purpose! Oh, the glorious possibilities!! There are some good ideas here on the link below, but personally I'm thinking wall art. I do love the lamp pictured above too, but wouldn't it be neat to somehow make a chandelier, or just have a few dangling from a lamp like this? I'm just throwing ideas out but this will for sure be on my list of must do projects. If and when I get to my project, I'll post pictures. Eeeee! I can't wait!

5 Ideas from Bob Vila

Tuesday, April 1, 2014

A Vision to Reupholster a Mid-Century Chair

What you will need:
An old chair and a vision.
Half an hour to debate over an insane amount of fabric choices, and then ultimately choose the red shag fabric that the original vision was based around anyway.
A staple gun that you may, or may not end up ditching half-way through because this fabric clearly has discipline issues and refuses to cooperate because it's slippery and rude.
A hammer and small brads in place of staple gun because the fabric must not win.
Also, in this particular case I needed a circular saw to cut the ends of the arms off where a certain very bad dog decided to eat the ends off. I was able to cut and sand the ends and then coat it with spray paint in order to pretend that never happened.

This is the part where it will benefit you to find an actual tutorial from someone who actually knows what they are doing. I totally winged it. The only reason it looks somewhat assembled is because I choose red shag fake fur. This, was no accident. I was hoping it would allow me to cover up the fact that I have never reupholstered anything in my life, and if you look closely, that becomes painfully clear. I basically bought a large piece of fabric and draped it over the chair and started cutting and stapling...and hammering. This is probably not the correct technical approach. BUT, in my defense, it is functional and very well staple/hammered together, I made a super awesome white shag pillow to match, not to mention the fact that it is now the most glorious chair in my house (I apologize to my other chairs).

So, just to wrap things up here, I think the only reason I'm posting this is because I've wanted to do this project for about 5 years now, I finally did it, it was not an epic failure and for that I am proud. Also, please don't judge my photoshop skills, or lack there of, that's another journey in itself.