
Sunday, July 27, 2014
Saturday, July 26, 2014
Bob Goblin! My daughter is obsessed with BobGoblin!

Bob Goblin!!!
So, I have a 3 year old daughter who is obsessed with Bob Goblin...when she says his name it comes out sounding more like Butt Garden, but we know who she's referring to. I guess since Wally Kazam is a fairly new show, there is not much merchandise available which forced me to venture forth to my local Hobby Lobby in search of materials to build the greatest Butt Garden...I mean Bob Goblin in the whole world. I failed... it is clearly not the greatest in the whole world, it's actually kinda creepy because really, it's just a floating head. I didn't have enough felt to do his little goblin body, but my daughter loves it, so
WooHoo! Success!
Materials
Felt
Stuffing
Yarn
Marker
Like all of my other mostly successful projects, I totally winged it. I used hot glue instead of sewing, which worked fine. I basically just glued the pelt together into a kind of pillow and put poly-fill inside. I actually needed some kind of structure to hold the ears out so I improvised and cut a zip tie in half and glued it to the inside, it worked out perfectly! I was lucky to find this horribly ugly vintage yarn that my mother had and it worked great for the hair, then I used a marker to give him some freckles. Voila! Bob Goblin was born and my daughter sleeps with him every night! :)
Thursday, May 15, 2014
DIY Red Hall Tree, Recycled Door, Added Bench Cabinet Hooks and Shelf

I hope that you are not expecting some grandiose tutorial because we totally winged it. If you look closely you can see that the cabinet is crooked and the shelf is about 6 inches lower from the top because it's covering a hole in the door that nobody seems to know how it got there...
When I started this project I really didn't even know what color I was going to paint it but once I decided on red, the rest just fell together. We went to Home Depot and bought all the wood to make the bench and the shelf, also all the hardware. I found the upholstery fabric later (on sale!) and knew it must be made into a bench cushion and was so glad to see how well it matched the red. It wasn't until we were trying to build the cabinet that I decided to use some base board trim that I had to frame in a piece of the fabric. I was so proud of myself for having that idea because I am in love with how the whole thing came together and turned out!
All in all, the project cost me roughly $100. Not too shabby considering what a difference it made to my entry way and the functionality it provides too. :)
Wednesday, April 30, 2014
Retro Vintage Old Cassette Tapes Lamp Shade (Recycled, Upcycled)


How completely magically awesome is this lamp?! I recently posted a link to a page that had a few great ideas for recycling old cassette tapes and one of those ideas was a lamp shade. Their shade was put together using zip ties and was more of a solid box construction...in retrospect that probably would have been much easier, but I wanted to think outside of the box....bahahahaha...Okay, that was bad, moving on...
As truly awesome as this lamp shade is, it was not the easiest of projects. I really hate it when bloggers post wonderful pictures about their wonderful projects and how wonderful and fun and easy it was ...LIES! Most of my projects have "Learning Experiences" otherwise known as "Epic Failures" filled with frustration, mess and sometimes even minor injury. That being said, I love it! I'm addicted to Pinterest, I'm addicted to Hobby Lobby and I'm pretty sure I want to be buried with my glue gun.
Anyway, on to the kind of a tutorial, I basically started with just a metal triangular top piece from an old shade that sacrificed it's old shade life for my new awesome project...moment of silence...no, not really, that shade sucked, that's why it had to die. So, metal triangle thingy, and then I took some sturdy cardboard (started out with a long wooden dowel, didn't work out, see Epic Failure section above) to make the thick triangle piece that I glued on top of the metal thingy and painstakingly wrapped it in yarn. Then came the equally not fun task of weaving the yarn in through the tapes. I wanted to have a dangling effect so I used a pencil to guide my gaps in between the tapes. Then I just tied the strands of tape to my triangle and Voila! A direct porthole to the 80's was just created in my living room! Endlessly fighting with yarn was totally worth it. :)

Friday, April 25, 2014
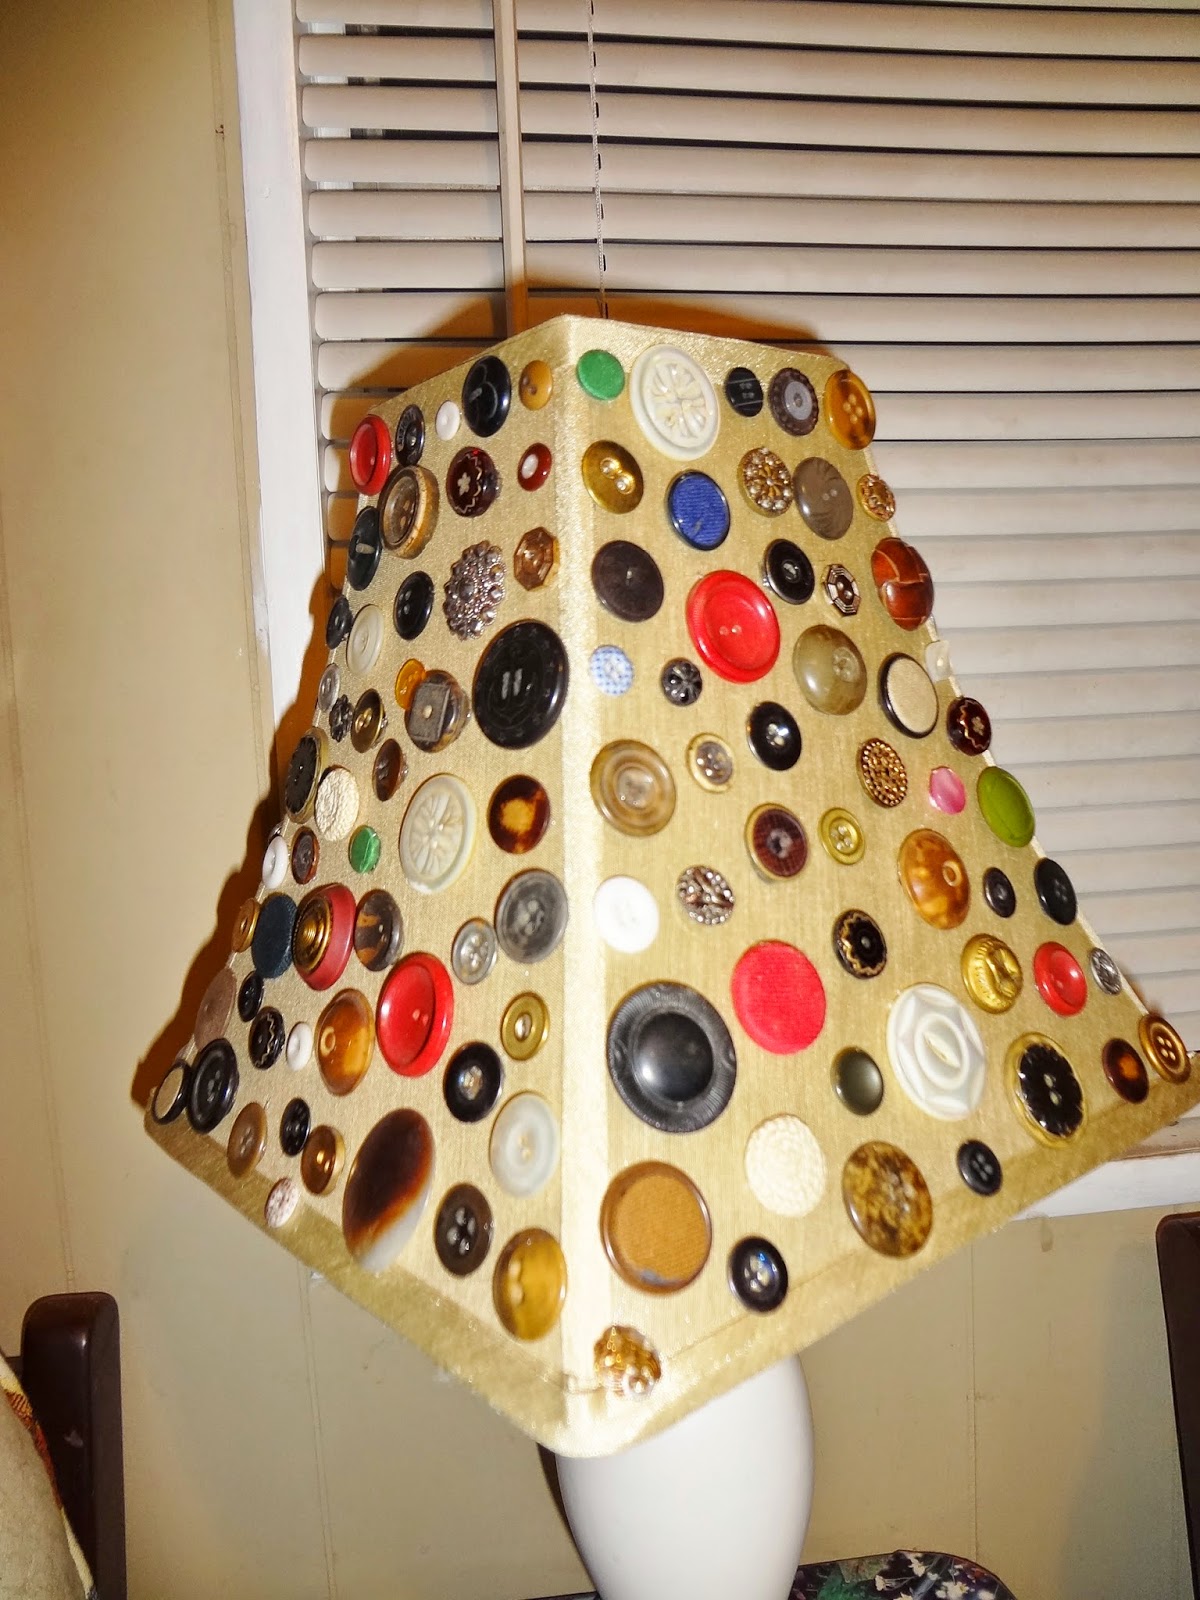
Vintage and Antique DIY Button Lamp Shade

So on to the tutorial...Glue the buttons on the lamp shade.
WooHoo, you're done!
Pretty easy stuff right? But here I will offer some tips that I learned from my experience...
1.) Not everyone is automatically gifted a bag full of really awesome buttons. Sucks to be you :( ...BUT :) you can buy vintage buttons in bulk on sites like Etsy or Ebay, Or you can even set out to buy some super wonderful buttons individually. Also check antique stores for jars or tins of buttons.
2.) Try not to over obsess on the placement of the buttons, random is good. (This advice is more of a reminder for me not to get all OCD when doing my projects.)
3.) Hot glue is the devil, but it's also really amazing stuff and I used it here. But if you've never used a hot glue gun before then you need to know that once you put the glue on the button and then the button on the shade, you just committed to that pretty much being it's permanent home, you won't have a lot of time to be moving it around before it dries. And then there is the sea of hot glue stringy mess to deal with...Weeee!
That's basically it! I really had a blast doing this and my kiddos liked helping me pick out "cool buttons", now on to the next project!
Thursday, April 24, 2014
Recycle or Upcycle old cassette tapes. Genius!

What an epic idea! I have a shoe box full of my cherished old cassette tapes that, even though I no longer have a device in this house with the capability to even think about playing a tape, I can't seem to part with them. I know that if I have an overwhelming urge to listen to Wham or need to get my Vogue on, I can easily find these old songs online (don't judge me, it was the 80's) but it's the tiny sappy hoarder that lives in my brain that says, as long as I have room in the shed or under a bed, they stay! But now they have an actual purpose! Oh, the glorious possibilities!! There are some good ideas here on the link below, but personally I'm thinking wall art. I do love the lamp pictured above too, but wouldn't it be neat to somehow make a chandelier, or just have a few dangling from a lamp like this? I'm just throwing ideas out but this will for sure be on my list of must do projects. If and when I get to my project, I'll post pictures. Eeeee! I can't wait!
5 Ideas from Bob Vila
Tuesday, April 1, 2014
A Vision to Reupholster a Mid-Century Chair

An old chair and a vision.
Half an hour to debate over an insane amount of fabric choices, and then ultimately choose the red shag fabric that the original vision was based around anyway.
A staple gun that you may, or may not end up ditching half-way through because this fabric clearly has discipline issues and refuses to cooperate because it's slippery and rude.
A hammer and small brads in place of staple gun because the fabric must not win.
Also, in this particular case I needed a circular saw to cut the ends of the arms off where a certain very bad dog decided to eat the ends off. I was able to cut and sand the ends and then coat it with spray paint in order to pretend that never happened.
This is the part where it will benefit you to find an actual tutorial from someone who actually knows what they are doing. I totally winged it. The only reason it looks somewhat assembled is because I choose red shag fake fur. This, was no accident. I was hoping it would allow me to cover up the fact that I have never reupholstered anything in my life, and if you look closely, that becomes painfully clear. I basically bought a large piece of fabric and draped it over the chair and started cutting and stapling...and hammering. This is probably not the correct technical approach. BUT, in my defense, it is functional and very well staple/hammered together, I made a super awesome white shag pillow to match, not to mention the fact that it is now the most glorious chair in my house (I apologize to my other chairs).
So, just to wrap things up here, I think the only reason I'm posting this is because I've wanted to do this project for about 5 years now, I finally did it, it was not an epic failure and for that I am proud. Also, please don't judge my photoshop skills, or lack there of, that's another journey in itself.
Friday, March 28, 2014
Mediterranean Tuna Salad with Tumeric and Cumin

Mediterranean Tuna Salad with Tumeric and Cumin. Zesty and Delish!
Ok, so I keep seeing these posts and reading stuff about the benefits of Tumeric and Cumin (also about a lot of other foods coincidentally that are missing from my diet, but we'll get there). Since they are not spices that I normally use so I had to buy them, but I really wanted to start experimenting with new spices so I figured, why not start with these! First off, if you haven't tried them, they are good, but bold so you'll want to use sparingly. Here is what I did to make a super scrumptious Mediterranean inspired tuna salad.
Main ingredients
One can any brand tuna in water
One tablespoon of mayo (more or less to your liking)
Roughly 1/2 teaspoon brown mustard
One tablespoon dill pickle relish
One tablespoon freshly grated parmesan cheese
One teaspoon chopped red onion (optional)
2-3 small chopped green olives (optional, would be fine on the side too)
Seasoning
Start small, you can always add more. I'm not one to really measure out my spices, but I used about
1/8th teaspoon of tumeric
1/8th teaspoon of cumin
1/8th teaspoon of garlic powder
That's it! You can always play around with the ingredients (maybe add a chopped hard boiled egg) and even double the recipe as needed. I served mine in a sandwich, but it would be great on crackers too!
Enjoy!
Thursday, March 27, 2014
Green Bean Surprise! My kids love this:) Quick, easy and cheap!

I invented this one night by accident and it turned out pretty tasty. The great thing about this is it's versatile and you can play with options like cutting it in half (choose one between the Chicken a la King or Cream of Mushroom and add only one can of Tuna and one French Style Green Beans) or add onions or other goodies, or even mix it all together and bake it like a casserole, but here are the basics for this dish.
Two cans of any brand tuna in water.
Two cans of any brand french style green beans.
One can of cream of mushroom soup. (Two cans if you don't like the chicken a la king.)
One can of Chicken a la King. (Two cans if you don't like cream of mushroom, OR if you can't find chicken a la king because they always put it on the isle that has the porthole to canned food Narnia apparently.)
Season to taste. Basic salt and pepper is good, garlic salt or garlic powder is delish and a dash of Cheyenne if you're feeling feisty.
Mix it all in a skillet and heat on medium until it starts to bubble, stirring frequently so not to glue itself to the bottom, slap it on a piece of toast and chow!
If you're going to do this casserole style, follow same steps but bake in oven dish for about 30 minutes and top with toast crumbles.
Collage a Table!
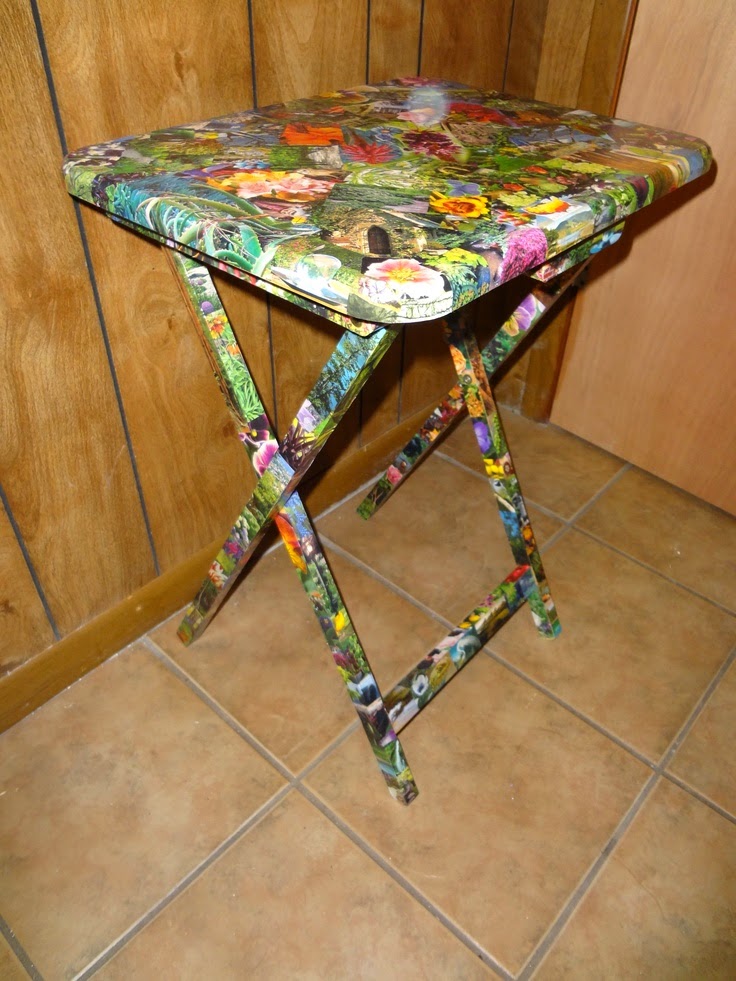
I bought a folding solid wood tray table at Wal-Mart for about $15 and really didn't have to do any prep to it at all. After cutting millions (probable exaggeration) of tiny pieces from all my garden and mail order plant magazines, (you can easily get mail order plant magazines by going to their websites and requesting one) and without trying to over think the color coordination and placement, I started to glue...and glue...
The best glue to use is just plain Elmer's school glue, or Mod Podge glue. There are a few tips and tricks that I've learned along the way too.
1.) Spread glue lightly in an even thin layer directly where you want your piece to go, then gently smooth it. If it starts to ripple or bubble try gently smoothing it some more with your finger. This may mean that you've used too much glue so try less next time.
2.) As your working, try to not get one area too soggy as once, jump around if you can or pause to let it dry for a bit and then continue. If you start overlapping and over gluing you're going to have a bad time. :/
3.) If you've never done collage work before and you want to practice before you take on an epic project like this, then try something small on a generally solid smooth surface.
4.) Once you're done gluing the pieces down and you're happy with how it looks then you can apply a top coat of glue once everything is completely dry. You can also apply the top coat as you're working, just make sure not over saturate and allow it to ripple. This top coat is very important to apply thinly but completely before you spray any kind of sealer, as the sealer will bleed into the magazine and cause it to look permanently wet. The glue will not do this.
5.) Let all the glue dry overnight and then you can apply a sealant clear spray. Follow directions depending on whatever spray you choose.
Have fun and good luck!
Welcome to my BLOG!!!
Welcome to my Blog! I’m so excited! I’ve wanted to do this forever and I finally sat my butt down and did it…started it anyway. In this blog you will find a bunch of randomness that I deem awesome. There will be some personal recipes and some borrowed (totally stolen) recipes. Lots of DIY (Do It Yourself) projects, some DWS (Do With Someone) projects and GSEETDIFY (Get someone Else Entirely To Do It For You) projects.
I will do my best to keep my personal religious and political views out of here, there are plenty of other blogs out there for that, but I may feel the need to rant about the A-Hole who cut me off in traffic, or post a glorified picture of my cat. >^.^<
That being said….Eeeeee! I can’t wait to start filling the scroll and I hope you will continue to visit.
Subscribe to:
Posts (Atom)